Powering Your Home: The Home Run Electrical Configuration Explained
Are you looking to increase efficiency, save costs, and improve safety in your electrical wiring projects? A Homerun in Electrical is a great way to do just that.
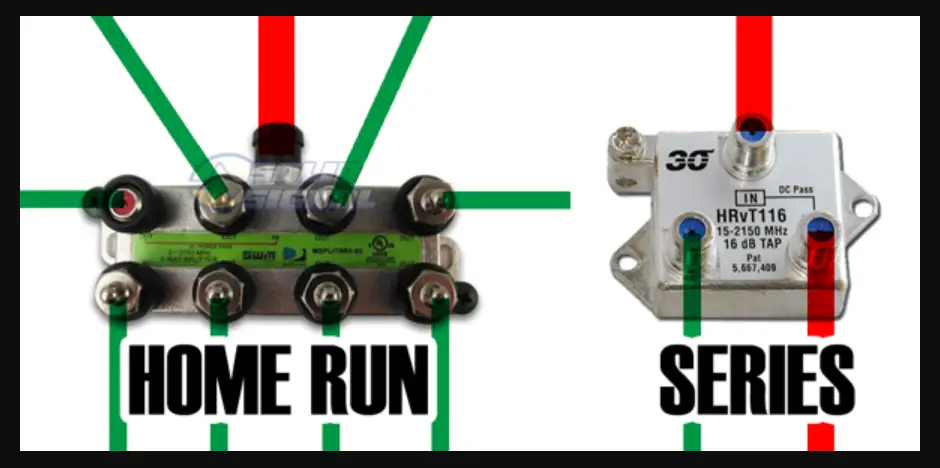
A home run in electricity refers to a wiring configuration where all of the electrical circuits in a home are brought back to a central location, typically a main electrical panel, for distribution to the various rooms and appliances.
This is in contrast to a “daisy chain” configuration, where circuits are run from one outlet or fixture to the next without returning to a central location. The home run configuration is considered to be safer and more efficient, as it allows for easier identification and isolation of any electrical problems that may occur.
By the end of this article, you will have a better understanding of what a Homerun in electrical is and how it can benefit your electrical wiring projects.
Benefits of Homerun in Electrical
Knowing what a Homerun in electrical is can provide many benefits for those working in the electrical industry. A Homerun is a wiring system that is used to connect a service panel to the electrical devices in a home or business. This type of wiring system is beneficial because it increases efficiency, saves money, and improves safety.
The first benefit of a Homerun in electricity is increased efficiency. Having all of the wiring connected directly to the service panel, it reduces the amount of time it takes to troubleshoot and repair any electrical issues. This also makes it easier to add additional electrical devices to the system, as all of the wirings is already in place.
Another benefit of a Homerun in electricity is cost savings. Having all of the wiring connected directly to the service panel, it eliminates the need for additional wiring and materials. This can save money in the long run, as it reduces the number of materials and labor needed to install the wiring.
improved safety is another benefit of Homerun in electricity. By having all of the wiring connected directly to the service panel, it reduces the risk of electrical shock or fire. This is because the wiring is more secure and less likely to become damaged or disconnected.
Avoiding Interference and Hazard: The Minimum Distance for Electrical and Water Lines Underground
rlc talk
What Does a Homerun in Electric Look Like?
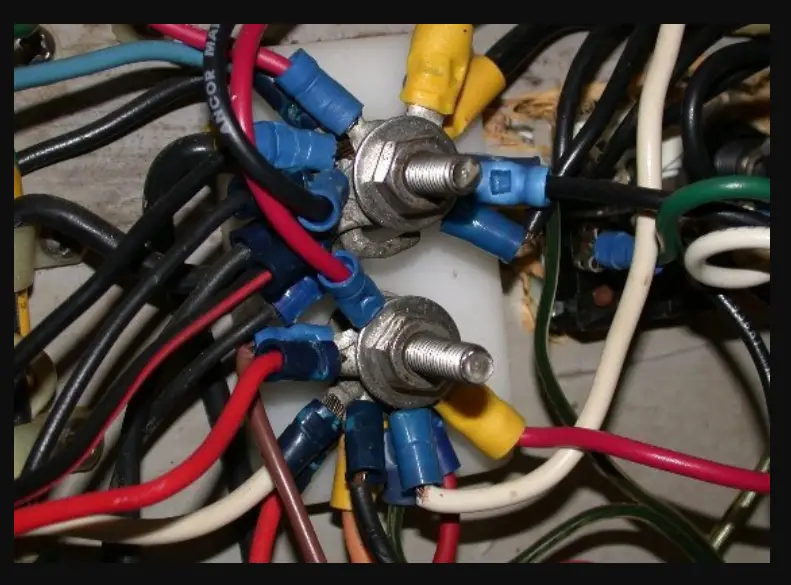
Now we know the benefits of Homerun, what does a Homerun in electricity look like? Well, it all starts with a wiring diagram. A wiring diagram is a visual representation of the electrical system in a building. It will show the power source, the devices that are connected to it, and the cables that run between them. This diagram is essential for understanding the Homerun wiring method.
Next, there are two types of connections that are used when making a Homerun. The first is a series connection, which is when the power source is connected to the first device, then the first device is connected to the second device, and so on. The second type of connection is a parallel connection, which is when the power source is connected to each device individually.
There are certain tools that are needed to make a Homerun in electrical. These include wire strippers, wire cutters, electrical tape, and a voltage tester. It is important to make sure that all of these tools are available before starting the wiring process.
Now that you know what a Homerun in electrical looks like, let’s discuss the steps to take when making one. Depending on the type of connection you are using, you will need to attach the cables to the power source and the devices.
Steps to Take When Making a Homerun in Electrical
Making a Homerun in electrical is an important part of any electrical wiring project. It’s a way to ensure that all the wiring is properly connected and that the connections are safe and secure. Here are the steps you need to take when making a Homerun in electrical.
Gather the Necessary Tools
Before you start any electrical wiring project, it’s important to make sure you have all the necessary tools. This includes a voltage tester, wire strippers, wire cutters, and a screwdriver.
It’s also important to make sure you have the right type of wire for the job. Different types of wire are used for different applications, so make sure you have the right type for the job.
Make the Connections
Once you have all the necessary tools, it’s time to make the connections. Start by connecting the wires to the appropriate terminals. Make sure the connections are tight and secure. If you’re using a junction box, make sure the box is securely mounted to the wall. Then, connect the wires to the junction box.
Test the Connections
Once the connections are made, it’s important to test them to make sure they’re secure. You can do this by using a voltage tester. This will help you make sure the connections are safe and secure. If the connections are not secure, you may need to make adjustments or replace the wires.
Making a Homerun in Electrical is an important part of any electrical wiring project. Knowing and executing the steps will help increase efficiency, save on costs, and improve safety by preventing electrical fires. If you are planning any electrical wiring projects, make sure you study a bit about this and how to properly make the connections. Q: What is a Homerun in electrical?
A: A Homerun in electrical is a wiring configuration that runs a single cable from the electrical panel to a device or outlet.
Copper For Electrical Wiring: The Science Behind It
rlc talk