Arduino Heater PWM; Must Read
What is PWM in Arduino? PWM, often known as pulse width modulation, is a method for producing analogue effects using digital technology. A square wave is produced via digital control, which is a signal that is toggled on and off.
This article discusses everything you need to know about the Arduino Heater PWM, with all the relevant information. So stick around until the end to find out what you’ve been looking for.
What is a PWM used for?
PWM is utilized in numerous applications, including power conversion and control as well as communications. PWM is frequently used, among other things, to regulate the brightness of lights, the speed of electric motors, and ultrasonic cleaning applications.
A PWM is essentially a digital unipolar square wave signal with adjustable (or modulable) ON time duration. In this manner, a microcontroller can manage the power supplied to the load.
The logic 1 level of the microcontroller output, which is dependent on the power supply voltage, typically controls the amplitude. It might be necessary for some applications to use external circuitry to boost the amplitude. In this project, we’ll be using the microcontroller’s output logic 1 level, which is +3.3 V.
What are PWM pins in Arduino used for?
PWM pins are frequently used to control DC motors and LEDs. The PWM in LEDs regulates the light’s frequency. It implies that the LED will turn on and off at a frequency that can be seen by humans. PWM in DC motors behaves like a series of pulses from a DC signal.
How to generate PWM with Arduino?
The “analogWrite()” built-in function of the Arduino IDE can be used to create a PWM signal. The value from 0-255 can be provided using this function, and the frequency of the generated signal for the majority of pins will be around 490Hz. A signal with a 0% duty cycle is indicated by analogWrite(0).
- analogWrite(0) means a signal of 0% duty cycle.
- analogWrite(127) means a signal of 50% duty cycle.
- analogWrite(255) means a signal of 100% duty cycle.
1. Connect your Arduino board to your computer with a USB cable.
2. Download and install the Arduino software.
3. Open the Arduino IDE and select the type of Arduino board you are using.
4. Create a new sketch (program) in the Arduino IDE.
5. Type in the following code to create a PWM output on pin 9:
// PWM output on pin 9
void setup() {
pinMode(9, OUTPUT); // Set pin 9 to output
}
void loop() {
for (int i = 0; i <= 255; i++) { // Loop from 0 to 255
analogWrite(9, i); // Output PWM signal
delay(10); // Delay for 10 milliseconds
}
}
6. Upload the sketch to the Arduino board.
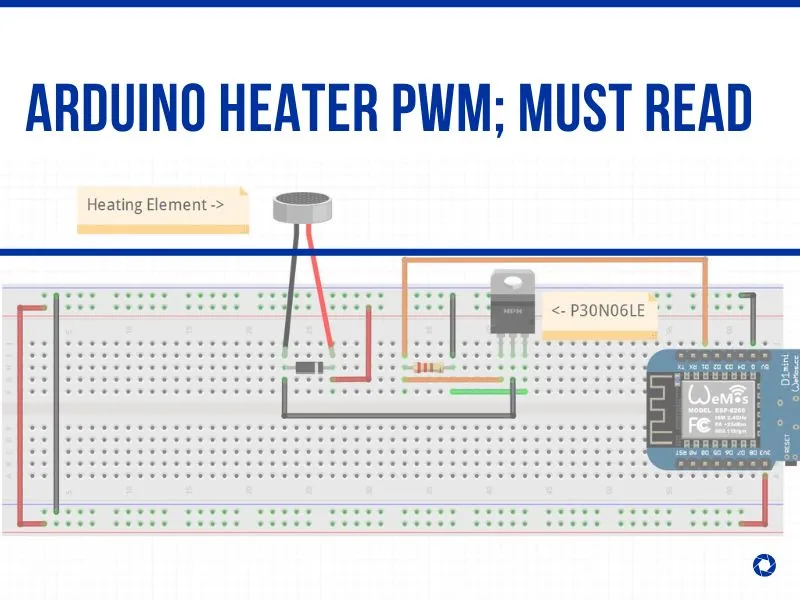
7. Connect a LED to pin 9 and the ground pin of the Arduino board.
8. You should now see the LED changing in brightness as the PWM output is generated.
LCD Displaying Black Boxes Instead Of Text | Arduino Troubleshoot
RLC Talk
What is the PWM frequency of Arduino?
The PWM signal on the majority of pins has a frequency of about 490 Hz. Pins 5 and 6 on the Uno and similar boards have a frequency of roughly 980 Hz. On the Leonardo, pins 3 and 11 also operate at 980 Hz.
What are the advantages of PWM in Arduino?
1. Improved motor control: PWM enables precise control of the motor speed and direction, allowing for smoother and quieter operation.
2. Improved efficiency: By reducing the amount of power needed to move the motor at a given speed, PWM can result in improved battery life.
3. Increased accuracy: PWM allows for more accurate control of the motor speed and direction, reducing the chance of overshooting or undershooting a desired position.
4. Wide range of speeds: PWM provides a wide range of speed control, from full speed down to a slow crawl. This is beneficial for projects that require a wide range of speeds, such as robotics.
5. Easy to implement: PWM is easy to implement with Arduino, and there are many tutorials available online to help beginners get started.
What are the drawbacks of PWM in Arduino?
1. Limited number of PWM pins: The Arduino Uno only has 6 analogue output pins that are capable of PWM output, which can limit the number of components that can be controlled simultaneously.
2. Limited range of frequency: The frequency of the PWM signal generated by an Arduino board is limited to a maximum of about 500Hz, which may limit the speed of certain applications.
3. Limited resolution: The resolution of the PWM output from an Arduino is limited to 8 bits, which translates to 256 steps of output. This resolution may not be sufficient for certain applications.
RLC Talk