How to Fix Hot Ground Reverse? Must Read Guide
When it comes to electrical systems, safety should always be a top priority. One common issue that homeowners may encounter is a hot ground reverse. Understanding how to address this concept is crucial in maintaining a safe and reliable electrical setup.
In this article, we will explore the causes and symptoms of hot ground reverse and provide a step-by-step guide on how to fix it.
Identifying the Symptoms of Hot Ground Reverse
Before diving into the troubleshooting process, it is essential to recognize the signs of a hot ground reverse. By being aware of these symptoms, you can take appropriate action to rectify the issue.
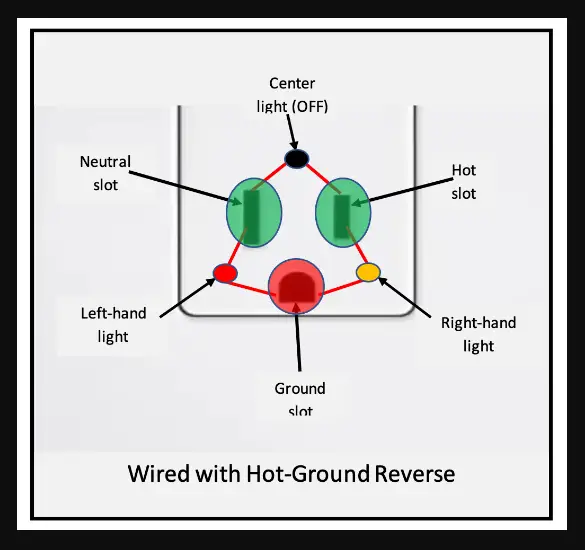
Abnormal voltage readings are often an indication of a hot ground reverse. You may observe volts above the specified range or experience fluctuating and unstable voltage levels.
Additionally, electrical shocks or tingling sensations when touching grounded objects can clearly indicate a hot ground reverse. If you notice any of these symptoms, it’s important to investigate further and resolve the issue promptly.
How do you know if neutral and ground are reversed?
If the neutral and ground are reversed, you can use a multimeter or plug-in tester to check for voltage between the ground and neutral terminals. If voltage is detected, it indicates a reversal. Additionally, visual inspection of wiring connections and consulting a qualified electrician can help identify a neutral and ground reversal.
What would cause a hot ground reverse?
Now that we understand the symptoms let’s explore the potential causes behind a hot ground reverse.
Faulty wiring connections
One common cause is faulty wiring connections. Loose or damaged grounding wires can disrupt the intended flow of electricity, leading to a hot ground reverse. Another possibility is incorrectly connected neutral and ground wires. These wires should never be interconnected, as they serve different purposes in an electrical system.
Equipment malfunction
Equipment malfunction is another factor that can contribute to a hot ground reverse. Defective appliances or devices and inadequate grounding in electrical systems can create an unsafe electrical environment.
Steps to Fix Hot Ground Reverse
To rectify a hot ground reverse issue, it’s crucial to prioritize personal safety throughout the process.
Step 01- Be safe first
Begin by turning off the main power supply to the affected area. This will prevent any potential electrical hazards while you work on the problem.
It’s also essential to wear appropriate protective gear, such as insulated gloves and safety glasses, to minimize the risk of injury.
Step 02- Inspect the electrical connections
Once you’ve ensured your safety, you can inspect the electrical connections. Carefully examine the grounding wires for any signs of damage or looseness.
If you identify any issues, such as frayed or loose wires, tighten or replace them accordingly.
Additionally, check the connection points between the neutral and ground wires. If they are improperly interconnected, separate them and establish the correct connections.
Step 03- Correcting faulty connections
Correcting faulty connections is the next step in resolving a hot ground reverse. Make sure to tighten any loose grounding wires securely. If you encounter damaged wires, replacing them with new ones is important.
In cases where the neutral and ground wires are incorrectly connected, reconfigure the connections according to the specific requirements of your electrical system.
Take your time during this process to ensure that each connection is secure and properly aligned.
Current Events: Can a Ground Wire Shock You or Just Electrify Your Life?
rlc talk
Hot neutral reverse fix; Step by step guide
Fixing a hot-neutral reverse in an electrical system requires caution and knowledge of electrical wiring. It is essential to prioritize safety and follow the necessary precautions. Here is a step-by-step guide to help you fix a hot-neutral reverse issue:
Step 1: Safety First
Ensure your safety by taking the following precautions:
- Turn off the power supply to the affected circuit at the main electrical panel. This involves switching off the corresponding circuit breaker or removing the fuse.
- Use a non-contact voltage tester to confirm the power is off at the outlet where the hot-neutral reverse is suspected. This device detects the presence of electrical voltage without direct contact.
Step 2: Gather Tools and Equipment
Collect the necessary tools and equipment before starting the fix. These may include:
- Insulated screwdrivers (flathead and Phillips)
- Wire strippers
- Wire connectors (wire nuts)
- Electrical tape
- Multimeter (for voltage testing)
- Flashlight (if working in dimly lit areas)
Step 3: Identify the Affected Outlet
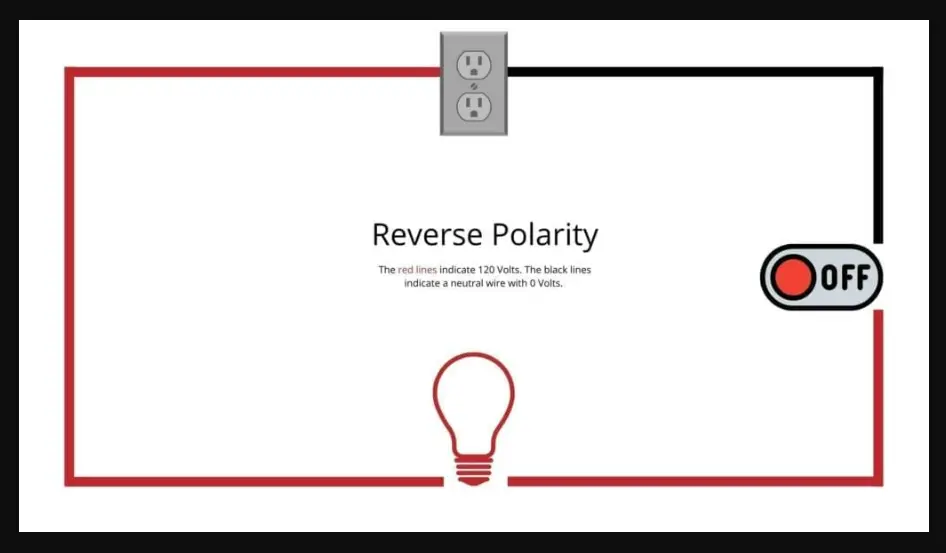
Identify the specific outlet where the hot-neutral reverse is occurring. Typically, this outlet will exhibit reversed polarity in electrical receptacles, meaning that the hot wire is connected to the neutral terminal and vice versa.
Step 4: Remove the Outlet Cover Plate
Using a screwdriver, remove the cover plate of the affected outlet to gain access to the wiring connections. Ensure that the power is still turned off at the main electrical panel.
Step 5: Inspect the Wiring Connections
Carefully examine the wiring connections within the outlet box. Look for any loose or improperly connected wires. Specifically, check the connections to the hot (black) and neutral (white) wires.
Step 6: Disconnect the Wires
Loosen the terminal screws that hold the wires in place. Gently disconnect the wires from the outlet. Take note of the wire color coding and the specific terminals to which they were connected.
Step 7: Correct the Hot-Neutral Reverse
To correct the hot-neutral reverse, you need to swap the connections of the hot and neutral wires. Do the following:
- Identify the hot wire (typically black) and the neutral wire (typically white).
- Swap the positions of these wires at the outlet. Connect the hot wire to the hot terminal (typically brass or black), and connect the neutral wire to the neutral terminal (typically silver or white). Ensure the connections are secure.
Step 8: Reconnect the Wires
Reconnect the wires to the appropriate terminals, ensuring they are tightly secured. Double-check that the hot wire is connected to the hot terminal and the neutral wire is connected to the neutral terminal.
Step 9: Test the Outlet
Turn the power back on at the main electrical panel for the affected circuit. Use a multimeter or a plug-in electrical tester to confirm that the hot-neutral reverse has been fixed. The tester should indicate the correct polarity (hot wire energizing the narrow slot and neutral wire energizing the wider slot).
Step 10: Replace the Outlet Cover Plate
Once the hot-neutral reverse has been corrected and verified, reattach the outlet cover plate using the screwdriver.
Remember, if you are uncomfortable or uncertain about working with electrical systems, it is always best to consult a qualified electrician to ensure the job is done safely and correctly.
Seeking Professional Assistance
While it’s possible to fix a hot ground reverse issue independently, knowing when to seek professional assistance is essential. If you are uncertain about performing electrical repairs or lack the necessary knowledge and experience, it’s advisable to call a qualified electrician.
Additionally, if the problem persists or worsens after your attempted fixes, it’s crucial to consult an expert to identify and address the underlying issue.
When choosing an electrician, check their licenses and certifications to ensure they are qualified for the job. Reading reviews and seeking recommendations from trusted sources can also help you find a reliable professional.
Is GND Positive Or Negative | Learn All About Grounding In Electronics
rlc talk
Conclusion
Fixing a hot ground reverse is crucial to maintaining a safe and functional electrical system. By identifying the symptoms and understanding the causes behind this issue, you can take the necessary steps to resolve it. Remember to prioritize personal safety throughout the process and seek professional help.
Regular electrical inspections and maintenance are also essential to prevent future issues and ensure the safety of your home or workplace. You can enjoy a secure electrical environment for years by staying vigilant and proactive.