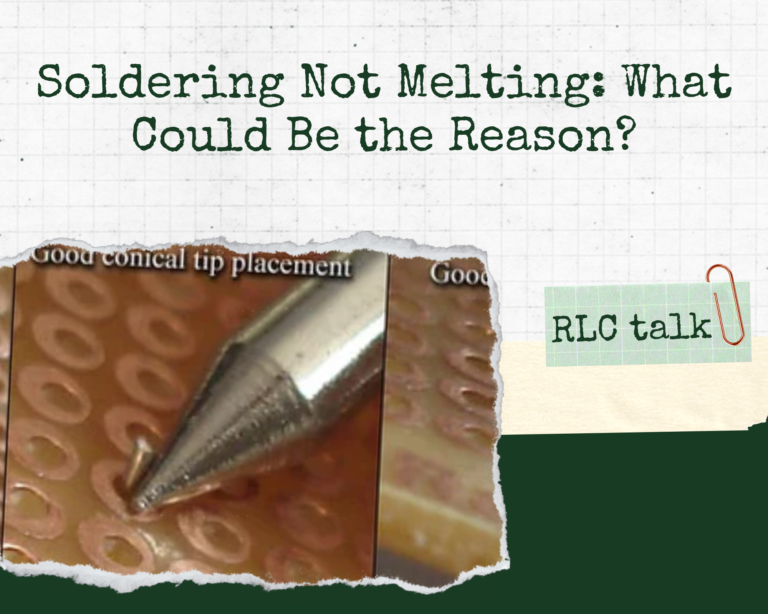
Solder Not Sticking To Copper; Why And How To Fix It?
Why isn’t my solder sticking to copper? Strong flux should sufficiently clean the metal so that soldering can take place. Copper components can be easily cleaned with pink erasers and given a light sanding before soldering because they oxidize quickly when exposed to air. If the solder is not heated sufficiently, it will not melt or cling to the desired metal.
In this article we discuss,
- Why is solder not sticking to copper?
- The solutions for it
- And a step-by-step guide for soldering copper.
- Fix for solder not sticking to battery
So I invite you to stick around until the end to find out what you’ve been looking for. This is your one and only RLC Talk.
Reasons Why Solder May Not Stick to Copper

There are many reasons for this problem and the following are those reasons I’ve found with my experience I will provide the fixes also when you are facing each problem.
- Oxidation of copper
Copper can easily oxidize in the presence of air or moisture, which forms a layer of copper oxide on the surface of the copper. This oxide layer can prevent the solder from bonding to the copper surface.
Fix
To overcome this problem, the copper surface needs to be cleaned and coated with a flux before soldering. Flux helps to remove the oxide layer and creates a clean surface for soldering.
- Not enough heat
Not applying enough heat during the soldering process can prevent the solder from melting and bonding properly with the copper surface.
This can happen if the soldering iron or torch used is not powerful enough, or if the heat is not applied long enough for the solder to fully melt and bond.
Fix.
To overcome this issue, it is essential to use the appropriate equipment and apply enough heat to ensure the solder fully melts and bonds with the copper.
Additionally, it is essential to ensure that the solder and flux are compatible with the temperature and heat output of the equipment being used.
- Contamination of copper
Copper can also become contaminated by dirt, grease, oil, or other materials, which can interfere with the bonding of solder to the copper surface. Contamination can occur during the manufacturing process or during storage and handling.
Fix.
Before soldering, the copper surface must be cleaned and degreased to remove any contaminants.
- Inadequate cleaning of copper
Inadequate cleaning of the copper surface can also prevent the solder from bonding properly. If there is any residue left on the surface, it can create a barrier that prevents the solder from flowing and bonding properly.
Fix.
Therefore, it is essential to clean the copper surface thoroughly before soldering.
- Poor quality solder or flux
The quality of the solder and flux can also affect the bonding of the solder to the copper surface. Low-quality solder or flux may not flow properly or may not bond to the copper surface effectively.
Fix.
To ensure a strong bond, it is essential to use high-quality solder and flux that are suitable for the type of copper being soldered.
What are the solutions to ensure solder sticks to copper?
Now you know the reasons why solder is not well sticking to copper, and not it is time to take a look at copper soldering best practices
- Proper cleaning and preparation of the copper surface
Before soldering, it is essential to clean the copper surface thoroughly to remove any dirt, grease, or other contaminants that could interfere with the bonding of the solder.
The surface should be cleaned using a suitable solvent and scrubbed with a clean brush. Once the surface is clean, it is crucial to dry it thoroughly and ensure that no residue remains.
- Use of flux to prevent oxidation
Flux is a material that is applied to the copper surface before soldering to prevent oxidation and contamination of the surface.
It helps to remove any existing oxide layer and prevent new oxide formation during the soldering process. The flux also helps the solder to flow and bond properly with the copper surface.
- Appropriate soldering temperature
The temperature of the soldering iron or torch must be appropriate for the thickness of the copper being soldered. It is important to maintain the correct temperature range during soldering to ensure that the solder fully melts and bonds with the copper surface.
A temperature that is too low will not melt the solder, while a temperature that is too high can damage the copper or even burn away the flux.
- Quality solder and flux
Using high-quality solder and flux can significantly improve the bonding of the solder to the copper surface. High-quality solder and flux have better flow properties, lower melting points, and better bonding strength, which make them more suitable for soldering copper.
It is important to choose the right type of solder and flux for the specific application, as different types of solder and flux are suitable for different types of copper and different soldering processes.
By following these solutions, you can ensure that the solder will stick to the copper surface effectively and produce a strong, reliable bond.
How To Remove Solder Without Wick?
rlc talk
Step-by-Step Guide to Soldering Copper

Here is a step-by-step guide to soldering copper:
Step 01:Preparation of tools and materials
Gather all the necessary tools and materials for the soldering process, including a soldering iron or torch, solder, flux, wire cutters, pliers, and safety equipment such as gloves and eye protection.
Step 02: Cleaning and preparing the copper surface
Use a suitable solvent and a clean brush to thoroughly clean the copper surface and remove any contaminants. Rinse the surface with clean water and dry it thoroughly.
Step 03: Applying flux:
Apply flux to the cleaned copper surface to prevent oxidation and contamination during the soldering process. Use a flux brush or a flux pen to apply a thin layer of flux to the surface. Make sure to apply flux to the entire area that needs to be soldered.
Step 04: Heating the copper and applying solder
Heat the copper surface with the soldering iron or torch until it reaches the appropriate temperature for the solder being used. Apply the solder to the heated area and allow it to flow and bond with the copper surface. Be sure to avoid touching the solder with the soldering iron tip, as this can cause the solder to cool prematurely and create a weak bond.
Step 05: Finishing and cleaning the soldered joint
Once the solder has cooled and bonded with the copper surface, use wire cutters and pliers to trim any excess solder or wire. Use a clean cloth or a brush to remove any flux residue and clean the soldered joint. Inspect the joint for any defects, and reheat and add more solder as needed to ensure a strong bond.
By following these steps, you can successfully solder copper and produce a strong, reliable bond. Remember to work carefully, use appropriate safety equipment, and take your time to ensure a high-quality joint.
Can you solder with a wood burner?
rlc talk
Solder not sticking to battery; Why and what are the fixes?
There could be several reasons why solder is not sticking to a battery, including:
- Battery surface contamination
Battery surfaces are often coated with oils or other contaminants that can prevent solder from sticking properly. This can be caused by handling the battery with bare hands, as well as exposure to moisture or other environmental factors.
- Battery surface oxidation
Battery surfaces can also become oxidized, which can create a layer of corrosion that prevents the solder from bonding properly. This can be caused by exposure to air or moisture.
- Battery material compatibility
Solder may not be compatible with the type of metal used in the battery, or the battery may be coated with a material that is not compatible with solder.
The fixes for solder not sticking to a battery are:
- Proper cleaning and preparation of the battery surface
Before soldering, clean the battery surface thoroughly to remove any dirt, grease, or other contaminants that could interfere with the bonding of the solder. The surface should be cleaned using a suitable solvent and scrubbed with a clean brush. Once the surface is clean, it is crucial to dry it thoroughly and ensure that no residue remains.
- Use of a suitable flux
Use a flux that is suitable for battery materials to remove any existing oxide layer and prevent new oxide formation during the soldering process. The flux also helps the solder to flow and bond properly with the battery surface.
- Use of a solder that is compatible with the battery
Choose a solder that is compatible with the type of metal used in the battery. Some batteries may require the use of a specialized solder that is designed to bond with the battery material.
- Use of appropriate soldering temperature
Ensure that the temperature of the soldering iron or torch is appropriate for the battery being soldered. It is important to maintain the correct temperature range during soldering to ensure that the solder fully melts and bonds with the battery surface.
By following these fixes, you can ensure that the solder will stick to the battery surface effectively and produce a strong, reliable bond.